[ pin out ]
https://randomnerdtutorials.com/ esp32腳位使用
D34, D35, D36(VP), D39(UN) all are input only!
我買的是30GPIOs ESP32 DEVKIT DOIT board 沒 GPIO0...。

179 元我最便宜 ESP32 Arduino相容 含藍芽WIFI ,
型號:DEVKIT (NODEMCU 32S )
https://goods.ruten.com.tw/item/show?21848118800764
180元 esp32s
[安裝] https://www.silabs.com/developers/usb-cp102-drivers
https://randomnerdtutorials.com/installing-the-esp32-board-in-arduino-ide-windows-instructions/
STEP 3 Tool > Board Manager > Arduino / Genuino Uno
不要漏掉呦! 我就是少掉,直接跳STEP4 , 一直裝不好
File > Preferences > additiomal boards Manager URL 加入下列

https://dl.espressif.com/dl/package_esp32_index.json,http://arduino.esp8266.com/stable/package_esp8266com_index.json
Tools > Board menu > DOIT ESP32 DEVKIT V1
選一個測試程式
6) Press the Upload button in the Arduino IDE. Wait a few seconds while the code compiles and uploads to your board.
8) Open the Arduino IDE Serial Monitor at a baud rate of 115200:
9) Press the ESP32 on-board Enable button and you should see the networks available near your ESP32:
--------------------------------------------------------------------------------------------
[錯誤排除]
Failed to connect to ESP32: Timed out… Connecting…
當你看到 “Connecting….” 時, 按下“BOOT” 鍵! 直到顯示Connecting。
[ESP-WROOM-32 DEVKIT V1 實作]
待測
4 PINs touch-panel-module
I2s DAC
esp32-i2s-to-play-wav-music-from-sdcard
www.twblogs.net/ 藍芽
esp32-m5stack-server-and-client 藍芽
以下是測試過的
A. 16x2 I2C OLED (PT0066) 測試成功
I2C LCD + OLED 16x2
Getting the LCD Address測試成功, Display Static Text on the LCD失敗。
上傳程式後 顯示RESET RTX...不用管它。
Arduino>Tool> Serial Monitor >跳出一個新視窗 > 右下方 baud rate >選 115200.
Press the ESP32 EN button. The I2C address should be displayed in the Serial Monitor.
以上可測出LCD 的位址。
露天賣家 附的LIBRARY及DEMO程式 測試成功
OLED 16x2 ASCII TABLE ascii 223: o at upper position, ascii 48: 0, ascii 80: P
B. 黃藍I2C OLED 測試成功 2019Feb.21
(賣家標示128x64 OLED 且附贈範列 但實驗失敗, 改用賣家附檔128x32 Library 內程式測試成功。)
PS 使用USB伸縮轉接線(方便PLUG IN, OUT) 很方便 !
C. 2.13"三色電子紙 接線及程式測試成功2019.Feb.22
方法:
一 Arduino >Tool > Manage library> install GEPD2 library
二 使用 c:/users/user/arduino/library/GEPD2/GEPD2.examples 修改內容後 測試成功。
(使用賣家範列實驗失敗) 賣家附的範例 compiling會有錯誤。
"avr/pgmspace.h: No such file or directory"
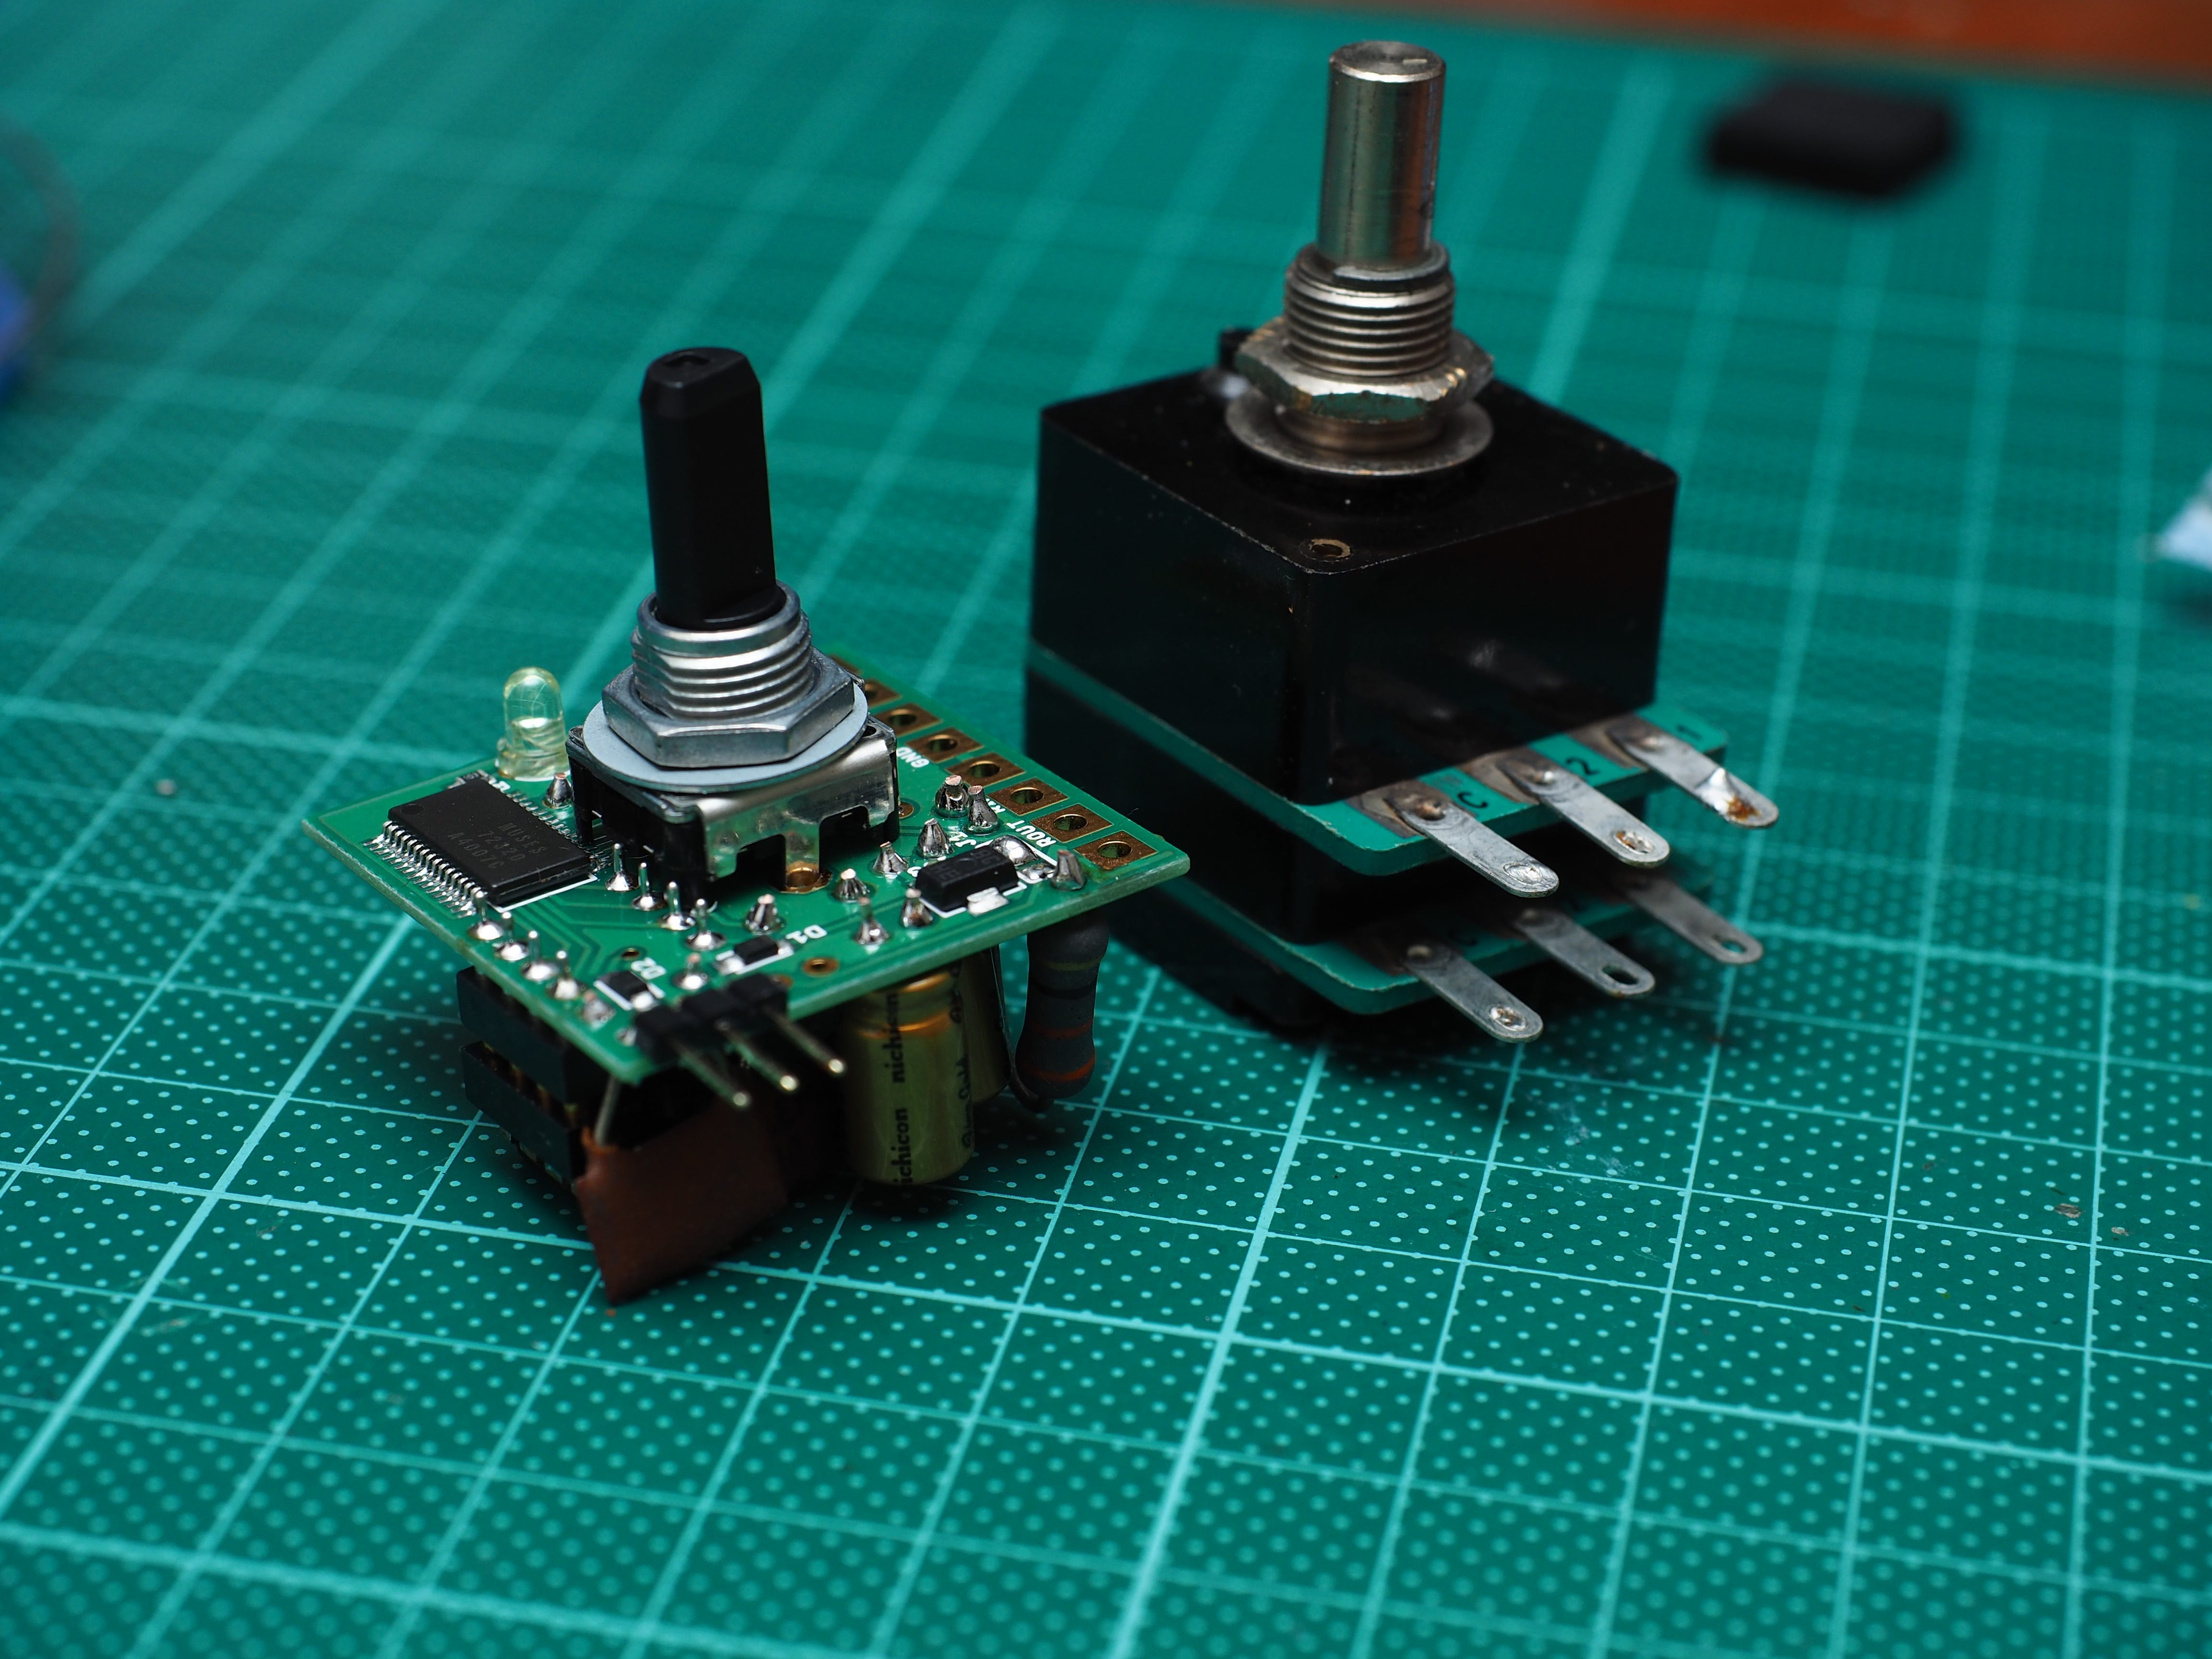
D. Encoder Switch 接線及程式 測試成功 2019.Feb.25
Enoder switch 程式 需要Arduino library? 需要用到中斷資源?
記得以前在PIC單晶片用state machine的觀念 很快就完成了!
前兩天 測試Arduino, 不用Library ,不用Interrupt。使用下列網路現成程式失敗。 henrys-bench/rotary-encoder 040-rotary-encoder switch , 符合預感 。
所以我今天下午, 把2005推出CS3310音量控制套件 使用PIC16F84A組合語言寫成的程式, 改成Arduino C 測試成功了!
後記
Google arduino rotary encoder switch,
看起來這程式也像state machine 觀念。
http://www.hobbytronics.co.uk/ 試用很順。
但後續加上16x2 I2C OLED 初步發現問題
重開機後, oled程式不動
慢慢檢查指令, 發現...
LCD.cursor(); 不能刪
刪除此指令 , no work after reboot, 非常詭異。
E. OLED16x2 I2C 整合旋鈕 加 按鍵
2019.Mar.1 test ok 調整 運作平順
重開機也可正常工作
F. DHT22 溫濕度 OLED顯示 Mar.03.2019 test ok
注意 setup()
dht.setup(DHTpin, DHTesp::DHT22); //DHTesp::DHT11for DHT11 Connect DHT sensor to GPIO 17
DHTesp::DHT11 要改成 DHT22
dht22-humidity-temperature可參考程式 OK
取用設定Setup(), temperature, humidity 另外自行更改float轉換int後顯示 成功
G. Esp32 pm2.5
我使用GPIO13 input for ADC, GPIO4 output . +5V供電給GP2y1014AU
下列兩個連結網頁的程式 都測試成功可以跑
。 我選用第一個
1.
阿玉maker研究區
https://sites.google.com/site/wenyumaker/03-pm2-5hui-chen-chuan-gan-qi
很好的範例
。SERIAL MONITOR 可顯示: 電壓... ug/m3
。
2.
SHARP 原裝夏普 GP2Y1014AU 接線及程式碼
賣家程式 我在家實驗 顯示2000以上,
不過 他加註0~1050
300-1050 = 一般
SHARP GP2Y1014AU
PS
1. ESP32 esp8266 v2 跳動不太穩
拉夫多多思考 推薦買更新型的PM2.5感應器
2. 其他PM感應器我沒買, 沒實驗
PMS5003T for PM1.0 ,2.5, 10 及溫濕度
PMS7003 PMS3003 for PM1.0、PM2.5、PM10
Dsm501 pm10, pm2.5
PPD42N
3. 小米空氣清淨機 感應器 升級
Joeyhc.blogspot.com/2018/03/ PMS7003
後來 我在ESP8266也使用PMS7003成功, 偵測顯示非常穩定。
為什麼又改用低階一點ESP8266呢?因它便宜只要一百元。
所以又試玩看看。
H. Bluetooth on ESP32
bluetooth-in-esp32-and-toogle-an-led
2018/05/esp32-m5stack-server-and-client
ESP32-BLE-Android-App-Arduino-IDE-AWESOME/
esp32-arduino-serial- 看來很簡單-over-bluetoth-hello-world/amp/
I. 0.95" oled color 96x64 ssd1331
GOOD
但很詭異 接腳不是影片說的 RES接D2, DC 接D4...
而是使用他的SSD_13XX library , 接線: 同下列第四點
可能是使用其他網頁的接線但程式失敗 改用SSD_13XX的EXAPLE成功
這種情形 印象中常常發生
實驗會成功 常常"突然"發生的
其實很辛苦
二 解壓縮 SSD_13XX-1.0 目錄後, 再將該目錄改名成 SSD_13XX ,
放進 C:\Users\user\Documents\Arduino\libraries\
三 arduino> Files>examples> SSD_13XX> Clock_example, 不用修改直接 upload to ESP32
四 接線:
ESP32 DEVKIT V1
GPIO 23 to oled SDA
GPIO 18 to oled SCL,
GPIO 5 to oled RST
GPIO 16(RX2) to oled DC
GPIO 17(TX2) to oled CS
[C 語法]
Arduino C goto
void changePinState(int pin)
// if pin reads LOW, set it HIGH
// if pin reads HIGH, set it LOW
{
int state=digitalRead(pin);
if (state == HIGH) goto skip_1;
if (state == LOW) goto skip_2;
goto error;
skip_1: state = LOW; goto done;
skip_2: state = HIGH; goto done;
error: Serial.println("Internal Function Error");
done: digitalWrite(pin, state);
}
--------------------------------------------------------------
switch (s0) {
case 0: // your hand is on the sensor
goto P1;
break;
case 1: // your hand is close to the sensor
goto P2;
break;
case 2: // your hand is a few inches from the sensor
goto P3;
break;
}
--------------------------follow case 0...59: compile error ----------------------------------
char grade;
int score;
switch (score) {
case 0...59 :
grade='F';
break;
case 60...69 :
grade='D';
break;
case 70...79 :
grade='C';
break;
case 80...89 :
grade='B';
break;
case 90...99 :
grade='A';
break;
default :
break;
}
Example
int i;
float f;

f = 3.6;
i = (int) f; // now i is 3
---
--------------------------------------------------------------------------
小狐狸事務所Arduino 基本語法筆記
小狐狸事務所 有很多相關範例
/pmwiki./Bitshift Arduino Bit shift
Example:
    int a = 5;        // binary: 0000000000000101
    int b = a << 3;   // binary: 0000000000101000, or 40 in decimal
    int c = b >> 3;   // binary: 0000000000000101,
The following example can be used to print out the value of a received byte to the serial monitor, using the Leftshift operator to move along the byte from bottom(LSB) to top (MSB), and print out its Binary value:
  // Prints out Binary value (1 or 0) of byte
  void printOut1(int c) {
    for (int bits = 7; bits > -1; bits--) {
     // Compare bits 7-0 in byte
     if (c & (1 << bits)) {
       Serial.print ("1");
      }
      else {
        Serial.print ("0");
      }
    }
  }
--------------------------------------------------------------------------
[其它網路資料]
/2019/01/25/esp32-dht11-22-humidity-temperature
iot-based-home-automation-project Home server
Waveshare e-paper with DEVKIT V1 成功範例
a 電子老兵賣家 附程式碼
B.
arduino 紅外線遙控
1. 1106 oled esp32
2. 不錯的ESP32範例esp32-and-oled-display-internet-clock-dht22-3. b142e4
OLD 待測
待測esp32-over-the-air-ota-programming/
4.
OLED+溫溼度感應
5.
影像
6.
安裝 python
7.
epaper 此網路資料 實驗沒成功
8.
Arduino>範例>ESP32>ESPNow>Basic>Master
9.
SH1106 oled I2C/how-to-use-arduino-esp32-to-display-oled.html
10.
esp32-pinout-reference-gpios/
11. ESP 32觸控
手指觸控式led開關
Botton 開關 :一端接3.3V電源,另一端同時連接220Ω電阻接地與GPIO21腳。
[本網頁 顯示器使用的接腳]
I2C
When using the ESP32 with the Arduino IDE, you should use the ESP32 I2C default pins (supported by the Wire library):
- GPIO 21 (SDA)
- GPIO 22 (SCL)
Epaper SPI
epaper SPI code & PIN assignment below
"My pinout
IO23 : MOSI
IO18 : CLK
IO17 : DC
IO16 : RST
IO5 : SS
IO4 : BUS"
我的電子紙測試,按照這接法, 成功。
其實GEPD2 Library範例程式內 有寫腳位如何接。
SPI E-PAPER?
espwroom-32-SPI/issues/4 esp-wroom-32 spi
[下載]
silabs Download for Windows 10 Universal (v10.1.4)
arduino IDE 1.8.8 直接下載IDE 1.8.8
安裝Python
PS
舊版?esp-wroom-32 日本範例
硬體
Hd44780 I2C LCD
看一下 阿旺師
OLED+溫溼度感應 下載程式碼